How To Put On Crown Molding On Kitchen Cabinets : How to Cut Crown Molding for Kitchen Cabinets | eHow UK : Cabinet crown molding is easier to install than room molding because the cabinets will tend to be close to square, while room walls are often not square.
How To Put On Crown Molding On Kitchen Cabinets : How to Cut Crown Molding for Kitchen Cabinets | eHow UK : Cabinet crown molding is easier to install than room molding because the cabinets will tend to be close to square, while room walls are often not square.. The benefit of installing crown molding is that it draws the eye upward, showcasing the elegance of your cabinets. In this video we will go over some tips and tricks that might help whe. I recommend at least 1 inch of space above the line to attach the trim. Spread an even layer of glue on the trim. Draw an arrow while keeping correct measurements to help you identify the angle for the miter cut.
I recommend at least 1 inch of space above the line to attach the trim. Miter the edge that meets the first strip of crown molding and hold the ends together. Measure a piece of crown molding equal to the length of the cabinet. Step 6 fill in the nail divots and joints Use a straight edge (such as a long level) to mark where the crown molding will sit on the cabinet facing.
My DIY Kitchen: Cabinet Crown Molding, How to Fake the Look Without the Fuss - Made by Carli from 4.bp.blogspot.com Repeat for each cabinet side. This video covers all aspects of cabinet molding installation, including side molding, toe kick, and crown molding. Crown molding that sits atop kitchen cabinets gives them a solid, finished look. With crown molding it seems like there are 10 considerations to make for every single cut. The benefit of installing crown molding is that it draws the eye upward, showcasing the elegance of your cabinets. Ask this old house general contractor tom silva installs crown molding on kitchen cabinets with full overlay doorssubscribe to this old house: In this video we will go over some tips and tricks that might help whe. Run a bead of glue along each piece of molding (image 1).
Repeat for each cabinet side.
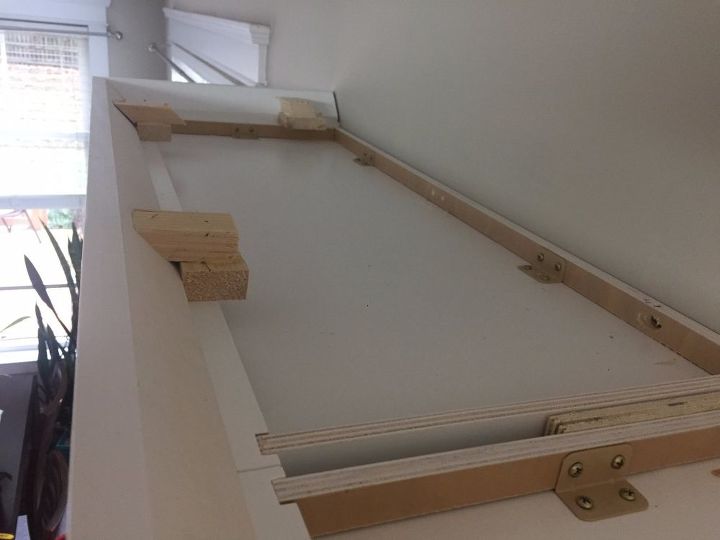
Provide a nailing surface for crown moulding by attaching solid wood mounting strips to the top edges of the cabinets. Crown molding that sits atop kitchen cabinets gives them a solid, finished look. Take a piece of molding larger than that measurement, lay it on your miter saw, on the left side of the blade. (use one long strip for a row of cabinets the same depth.) then apply wood glue to each strip, nail it in place, and let dry. When installing the top of a cabinet, space the finish nails about 12 to 16 inches apart. Cut a molding strip at least 8 inches longer than the length of the front of your cabinet. If you have cabinets that don't have enough room to attach directly, b uild a frame to sit on top of the cabinet. Use a straight edge (such as a long level) to mark where the crown molding will sit on the cabinet facing. Cabinets with crown moulding (how to install crown molding on kitchen cabinets) installing nailer strips. Hold the crown molding on the sides of the overlay cabinet and make sure the filler pieces are fit tightly against the wall. I recommend at least 1 inch of space above the line to attach the trim. Use a combination square to draw a line across. Be sure the pieces are tight against the wall.
Cut a mating angle on the next piece of crown, then apply carpenter's glue to end of molding. (use one long strip for a row of cabinets the same depth.) then apply wood glue to each strip, nail it in place, and let dry. Measure a piece of crown molding equal to the length of the cabinet. Not only do you have to be aware of an inside corner, outside corner, right board, or left board, you also have to magically hold the crown molding up against your miter saw fence at just the right angle or else your corners will never fit together. In this video we will go over some tips and tricks that might help whe.
Kitchen Cabinet Crown Molding - Make Them Fancy! | Hometalk from cdn-fastly.hometalk.com Ask this old house general contractor tom silva installs crown molding on kitchen cabinets with full overlay doorssubscribe to this old house: Finding the right crown moulding for your kitchen cabinets. Run a bead of glue along each piece of molding (image 1). Check out our video review and demo of adding crown molding to your kitchen cabinets. Measure a piece of crown molding equal to the length of the cabinet. Start by assessing the cabinets. I recommend at least 1 inch of space above the line to attach the trim. Cut a molding strip at least 8 inches longer than the length of the front of your cabinet.
With staggered cabinets, allow the crown.
Crown molding is decorative trim that is added to the top of your cabinets. Measure and mark the front section of crown molding to the cabinet width. Miter that end of this strip and then attach it to the backing wood with the nail gun. Step 6 fill in the nail divots and joints Hold the crown molding on the sides of the overlay cabinet and make sure the filler pieces are fit tightly against the wall. Now use your pencil to mark the dimensions from the inside to cut the molding. How to install wide crown to tops of kitchen cabinets wallpaper. Spread an even layer of glue on the trim. Run a bead of glue along each piece of molding (image 1). Finding the right crown moulding for your kitchen cabinets. Cut at one mark, then move the molding along to the next mark. The benefit of installing crown molding is that it draws the eye upward, showcasing the elegance of your cabinets. Cut crown molding for front of cabinet measure the length of the front piece of baseboard.
If you have cabinets that don't have enough room to attach directly, b uild a frame to sit on top of the cabinet. Cut at one mark, then move the molding along to the next mark. Hold up the crown molding on the sides of the cabinet. Run a bead of glue along each piece of molding (image 1). Crown molding can either bond with the ceiling or allow for space above the cabinet.
Consider this crucial graphic as well as look into the here and now details on Kitchen … | Crown ... from i.pinimg.com Hold the second piece of crown tight against the first piece, then nail it to the cabinets. Step 6 fill in the nail divots and joints (use one long strip for a row of cabinets the same depth.) then apply wood glue to each strip, nail it in place, and let dry. These steps may vary depending on your kitchen, cabinets, style, and crown moulding, however, it can give you a pretty accurate idea of the scope of your project. For the front filler piece, drill from underneath the inside of the cabinet, and then secure that piece with wood screws. Start by assessing the cabinets. You don't want this molding to pull off the cabinet if someone pulls or pushes on it when moving the cabinet, for example. Run a bead of glue along each piece of molding (image 1).
Crown molding can either bond with the ceiling or allow for space above the cabinet.
Cabinets with crown moulding (how to install crown molding on kitchen cabinets) installing nailer strips. For the front filler piece, drill from underneath the inside of the cabinet, and then secure that piece with wood screws. Start by assessing the cabinets. When installing on a wall, use the pneumatic nailer to secure the crown molding at the wall studs. Measure a piece of crown molding equal to the length of the cabinet. From the sides of the cabinet, nail the filler pieces in the place. Provide a nailing surface for crown moulding by attaching solid wood mounting strips to the top edges of the cabinets. House flipping brothers dave and rich show how to install kitchen cabinet crown molding and trim with tips.this video covers all aspects of cabinet molding i. Miter that end of this strip and then attach it to the backing wood with the nail gun. Cut crown molding for front of cabinet measure the length of the front piece of baseboard. And yes on the gluing of joints and miters. Not only do you have to be aware of an inside corner, outside corner, right board, or left board, you also have to magically hold the crown molding up against your miter saw fence at just the right angle or else your corners will never fit together. If you have high ceilings, we recommend leaving space.